USB N-Button Push Notification SetupInstructions for USB Push Notification & N-Button |
USB Setup1. Connect USB cable between your ZUSB Communication Interface and your computer. The ZUSB communication module contains the USB port on the Push Notification board. The board should be powered for initial testing.2. Virtual COM port drivers are required before the ZUSB communications module can be used. - Windows 10, 8 and 7 typically recognizes this device without drivers, however, the latest drivers may be downloaded and installed from the following location for all operating systems: https://www.ftdichip.com/Drivers/VCP.htm. This link also contains installation instructions appropriate to your operating system. 3. After the driver is installed, open your “Device Manager” to determine the COM port your computer assigned to the ZUSB module. 4. You should see “USB Serial Port” located under “Ports (COM & LPT)” 5. Take note of the COM port assigned to the ZUSB communications module. This COM port will be used to access the device in N-Button. In the screen shot shown, COM13 was assigned. When running N-Button in this example, COM13 will be used to access this device. The COM Port on your computer will most likely be different. It is possible to have multiple devices installed on one computer, each device will have its own COM port number assigned to it. 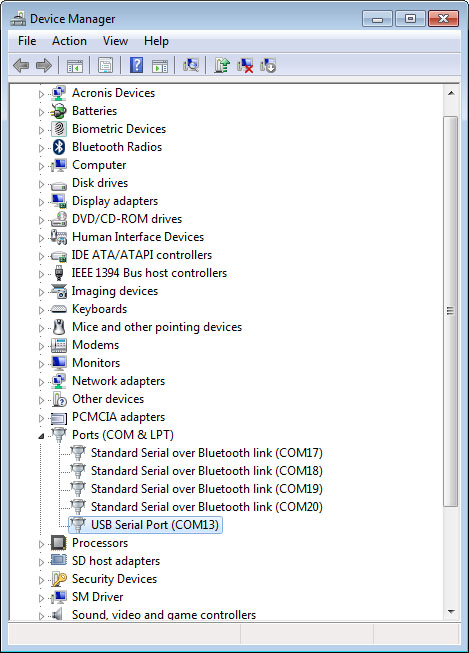
Note: The USB Light will on the ZUSB communications module will only illuminate if the virtual COM port driver is properly installed. If the device remains undetected, try disconnecting and reconnecting the power and USB cables. N-Button Communication & Scan Channel Setup1. Download and install the version of N-Button Pro or N-Button Lite that you purchased with the board.N-Button Lite: http://serialporttool.com/download/NButton/NButtonLite.zip N-Button Pro: http://serialporttool.com/download/NButton/NButtonPro.zip 2. Plug in power and connect USB push notification board to your computer. 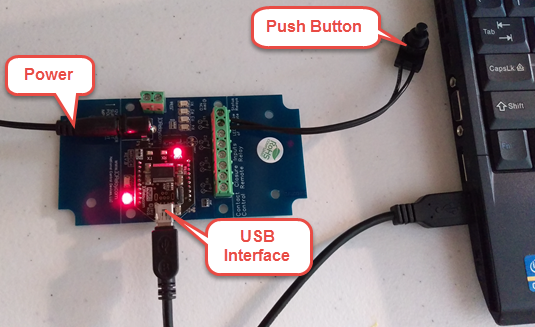
3. Run N-Button Pro/Lite software. Click Device Manager –> New to add USB push notification board Manufacturer –> National Control Devices Board Type –> Push Notification Com Port –> Port Name (Your USB COM Port #) and Baud Rate 115200 Keep default value for other options 
–> Click OK for above panels, and back to N-Button Manager panel. 4. Click Scan Channel to open Properties – Scan Channel. Select Device, Bank ID, Channel ID, Style for Scan Channel widget. 
Once you have selected the Device and Style of your widget Click OK to close Scan Channel Window and return to N-Button Manager Window. –> Click OK in N-Button Manager Window to exit. You will now see the Scan Channel widget you created showing on your desktop with Red color. 
5. Using a dry contact (no voltage) close the contacts of the input you have set, you will see the Scan Channel widget on your desktop turn to Green. Release the button, the widget turns to red again. 
The USB push notification board is now working with N-Button software. The widget you crested is now showing the status of the input. To send text message and/or email follow the steps below. Text/Email Setup1. Right click on the widget you just created and select N-Button Manager to open N-Button Pro/Lite Manager again.–> Click Automation to open the Automation Manager Window. –> Click New in the Automation Manager Window to open the Rule Type Window. –> Click Push Notification Contact Closure Rule 
2. Select Settings under Push Notification Contact Closure to select the device you created and the channel you want to use. Select Settings under Action When Status Changes from Open to Close. Under Action Type select Send Email. Enter the Gmail account information you will be using to send the email. Then enter the address where you want the email sent, for more than one recipient separate the addresses with a comma. Add your Subject and message. You can also set a message for other actions such as when the contact closure opens or send messages in intervals until the contact closure opens. –> Click OK in all open windows and return to the desktop. 
3. After finishing all above settings, all recipients will receive an email once the contact closure input on the board changes state. To test, close the contact input on the push notification board and check your email Note: If you use Gmail, you need turn on for “Allow less secure apps” on your Gmail Account –> Sign-in security panel, shown as below. 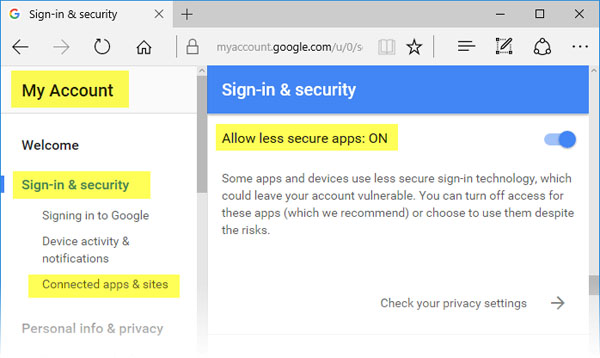
USB Push Notification Video |
Data Sheets & Quick Start GuidesBelow are the Data Sheets Quick Start Guides for this software. These are the guides that will help you setup the software and get it configured. The Wi-Fi Push Quick Start Guide is a Step-By-Step guide to getting the Wi-Fi Module on your network and setting up N-Button Software. |

