NCD5500 Configuration Software for Windows
NCD5500_CONFIG

NCD5500 Configuration Software
Not only is a web UI supported (as in previous generations), but also this new Windows application may be used to change settings and recover modules with an unknown IP address. New firmware upgrade options are now available, allowing users to upgrade firmware as new features are released.Reliable Control Over Ethernet
Bring NCD controllers onto your Ethernet network with dependable, plug-and-play control. The Gen3 Ethernet module delivers fast TCP/IP communication, easy web-based setup, and seamless Base Station compatibility - ideal for stable, always-on relay control.
Gen3 Ethernet Relay
"The Gen3 module delivers stable TCP/IP communication"
NCD5500_CONFIG - Gen3 Relay Control
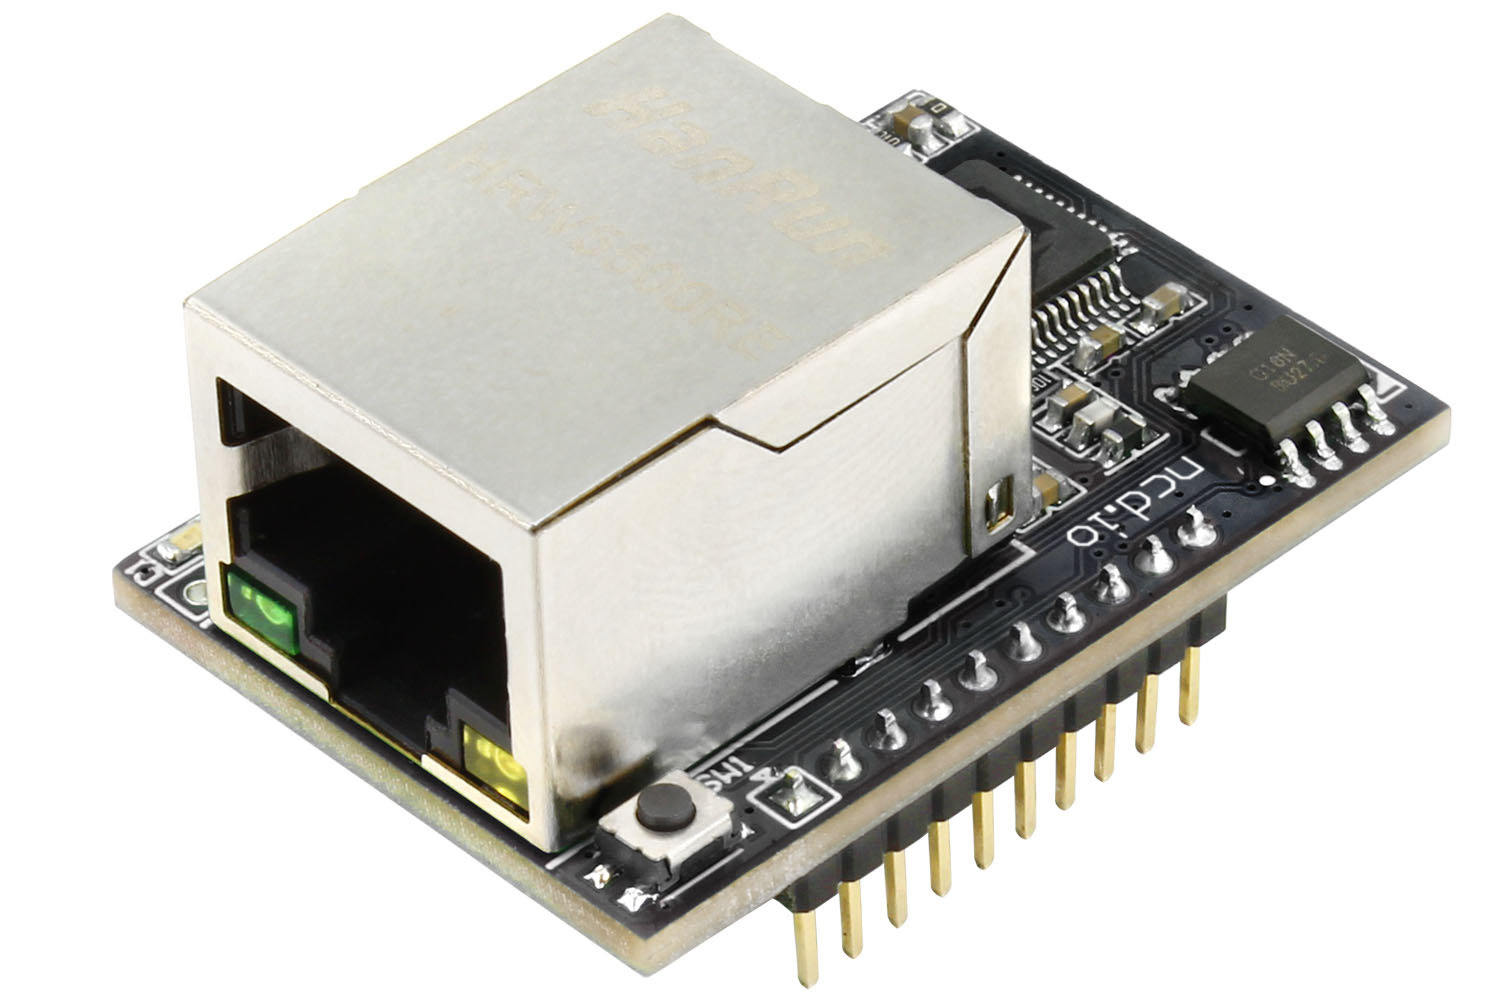
Meet the NCD5500 Ethernet-to-Serial Converter, NCD's 3rd-generation Ethernet module designed for exceptional reliability, ease of use, and lower cost. This modular interface brings the entire line of NCD Industrial Devices onto your Ethernet network with plug-and-play simplicity.The NCD5500 works seamlessly with Base Station, making IP discovery and configuration fast and simple.
💡 Relay Pros ProTip:
Ethernet modules must connect to a router or network switch to receive an IP address. Plugging the module directly into a computer's Ethernet port will not establish communication.Ethernet to Serial Communications Module
 The Gen3 module converts TCP packets to serial data (and back again) for smooth, real-time control.
- Features include:
- Auto Socket Control - Choose to close the socket after a programmable timeout or keep the connection open
- Connection Status LED - A blue LED indicates an active socket connection
- Flexible Baud Rates - Adjustable from 9600 to 115.2K, using the default TCP port 2101
- Network Options - Supports both Static IP and DHCP
- One-Button Recovery - Restore factory defaults instantly with a simple button press
DHCP and Static IP Addresses
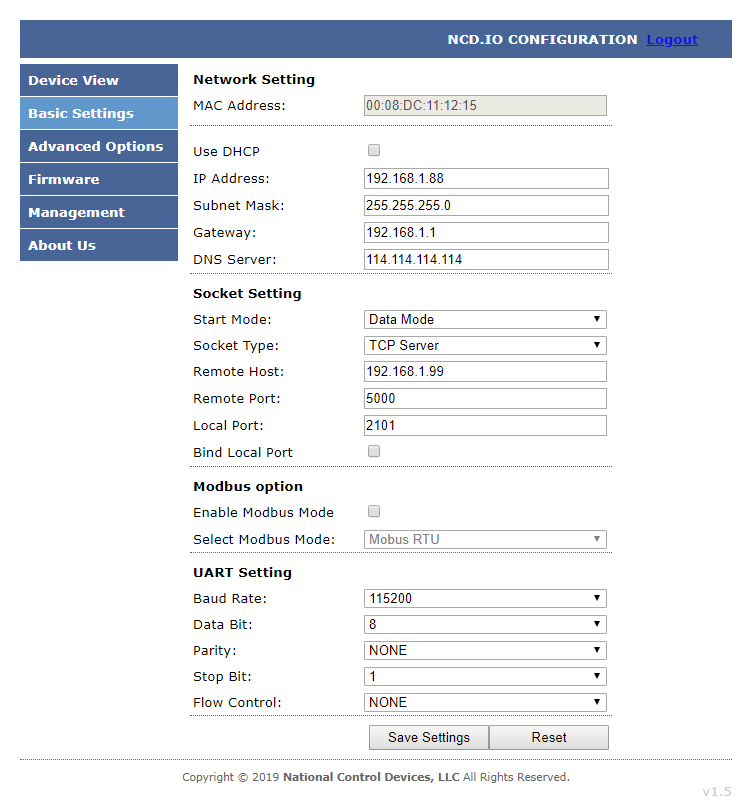 This module supports both DHCP and Static IP addressing.
For the most reliable remote access, we recommend using a Static IP Address once you are comfortable with the network configuration. This ensures consistent communication and predictable device access.
TCP/IP Communications
The primary communication method is a standard TCP Socket. This creates a bi-directional connection, allowing your computer or control system to send commands and immediately receive responses through the same socket - fast, robust, and ideal for relay control applications.3rd Generation Hardware
The latest hardware represents a major leap forward in reliability, usability, and cost efficiency.- Key improvements include:
- Lower overall cost compared to previous generations
- Enhanced recovery options
- Web-based configuration UI
- Windows utility for discovering devices with unknown IP addresses
- Firmware upgrade support for feature updates and improvements
Password Protection
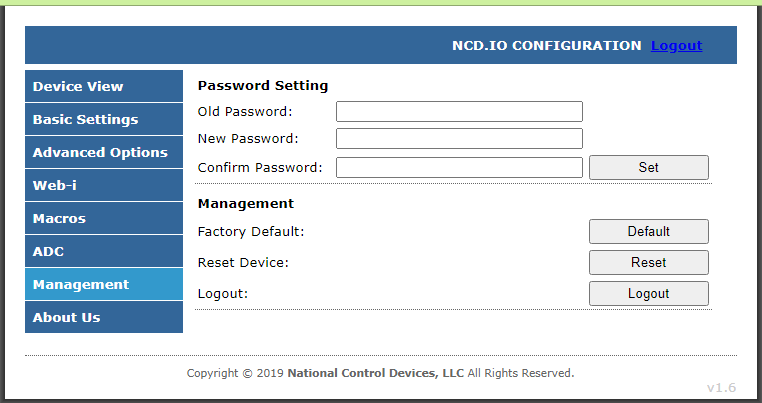 Password protection is built in.
Under the management tab, users can assign a password for added security and access control.
Default web-page login password: admin (user-changeable).
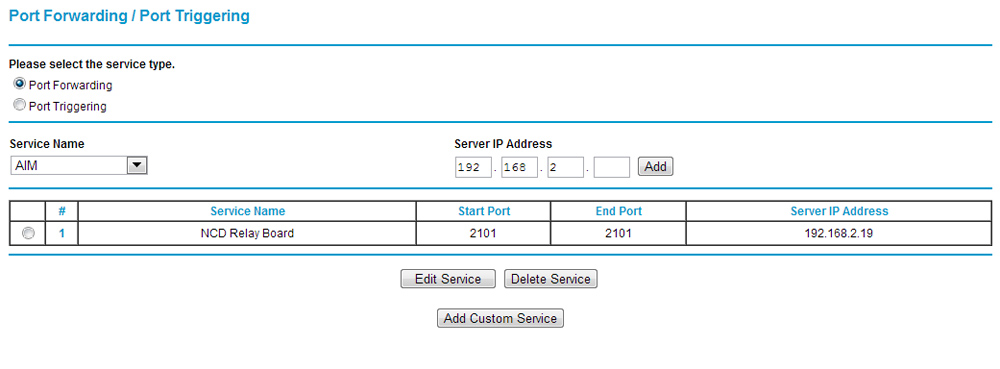
Port Forwarding
To access the module from outside your Local Area Network, Port Forwarding is required.Your router forwards incoming requests on a specific port (e.g., 2101) to the device's local IP address.
Example:
A router is configured to forward port 2101 to 92.168.2.19:2101. Any external request to port 2101 is automatically routed to the module. Without this rule, the router would not know where to send the request, and the connection would fail.
Note: Port Forwarding is not needed for communication within your LAN.
For step-by-step instructions for virtually any router, visit https://portforward.com/ .
Easy Network Configuraton
You'll configure this board using the NCR5500 Ethernet Configuration Software - a Windows app that makes setup quick and simple.
MCNET / MXNET Setup
"A quick setup gets you rock-solid network control"
Before You Start (Requirements)
These boards communicate over your Local Area Network - not the public internet. Both boards must be on the same LAN and assigned a static IP address. They do not work if the boards are plugged directly into each other or directly into a computer - they must be connected through a LAN.We strongly recommend assigning IPs outside your router's DHCP range to avoid conflicts.
If this installation is part of an IT-managed network, share this guide with your network administrator before beginning.
Static IP Required
During configuration, you'll designate one board as the server and the other as the client. Each board also requires a static IP address. If the boards are left on DHCP and the router power cycles, the router may assign new IP addresses, which means the client board may no longer know where to find the server board - communication stops cold. Assigning static IPs prevents that.We recommend assigning addresses outside your router's DHCP range. One board will act as the server while the other acts as the client, connected through a TCP socket. You can choose any port number you like - in our setup we used port 2101. This can matter if the boards are on separate subnets.
Relay Pros / NCD can't provide support for complex network setups - for that level of configuration, your network admin is the one to loop in.
Windown Configuration
Setup requires the free configuration software and a Windows computer connected to the same network as the boards.Managed Network Required for Setup
Out of the box, both boards are set to DHCP mode. That means configuration must begin on a managed network.Once setup is complete, the boards may be installed on an unmanaged network, no problem.
Configuration
Initial setup
- Download and install the NCD5500 NCD 5500 Configuration Software.
- onnect standard Ethernet cables to both boards, attach them to the network, and power them with a regulated 12VDC supply.
- Open the NCD5500 Configuration software.
- Click Search until both boards appear in the list.
Each board will be identified by its MAC address, which is also printed on the Ethernet module - helpful for telling them apart.
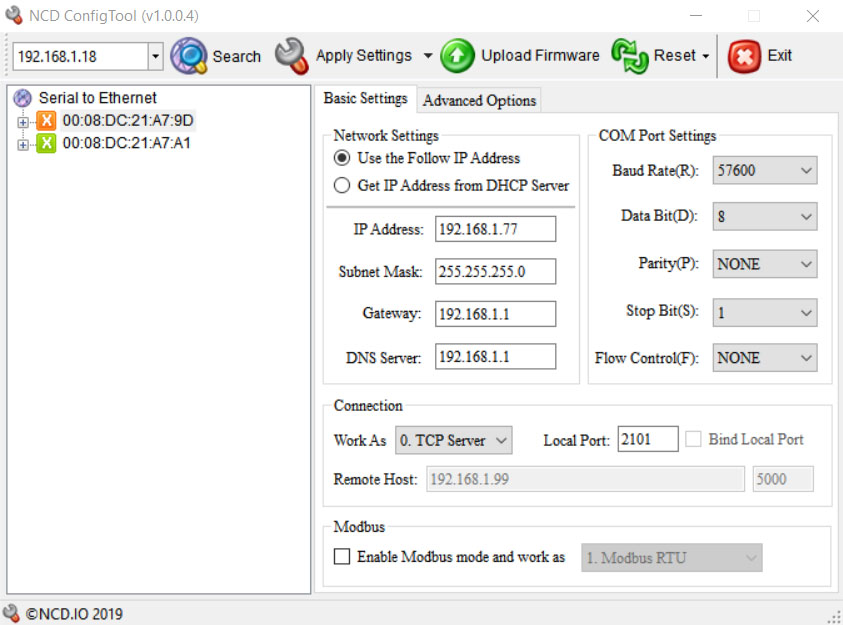
First board Configuration (Server)
- Select one of the boards to open its settings.
All steps are under Basic Settings - nothing needed in Advanced Settings. - Set the baud rate to 57600.
- Under Network Settings, switch to Use the following IP address.
- Assign a static IP address and enter Subnet Mask, Gateway, and DNS Server as required for your network.
- Under Connection, set Work As to TCP Server.
- Enter a Local Port (any port except 80). We used 2101 in our testing.
- Click Apply Settings.
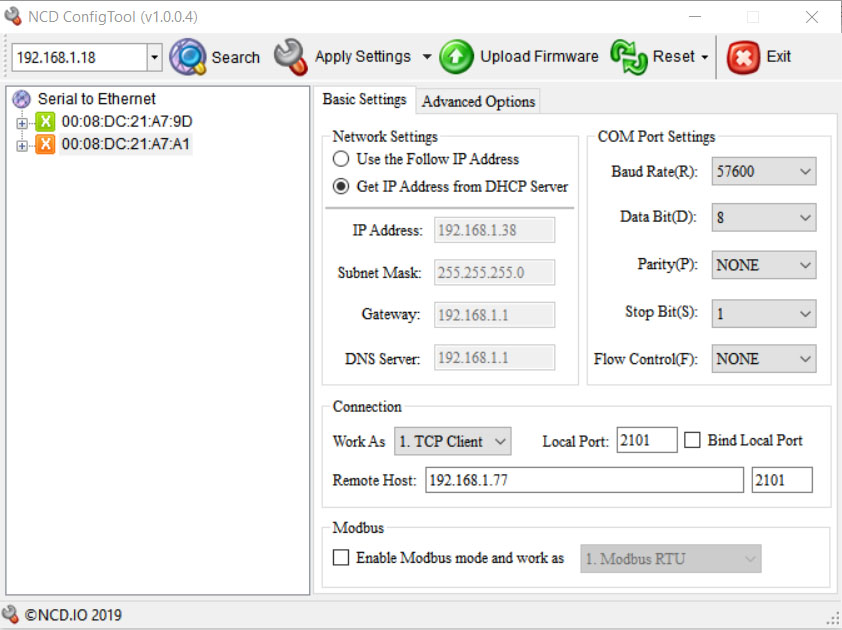
Second Board Configuration (Client)
- Select the second board to open its settings.
- Set the baud rate to 57600.
- Switch Network Settings to Use the following IP address.
- Assign a different static IP address, and enter Subnet Mask, Gateway, and DNS Server.
- Under Connection, set Work As to TCP Client.
(Local Port is not required here.) - Enter the Server Board's IP address into the Remote Host field.
- Enter the Server's Local Port number in the Port field.
- Click Apply Settings.
Final Testing
Once settings are applied on both boards, communication should establish automatically.You can verify a successful TCP connection two ways:
- The red LED on the Ethernet module (next to the metal jack) will be solid on.
- The Busy/Ready LEDs on the boards will flash periodically, confirming communication.