
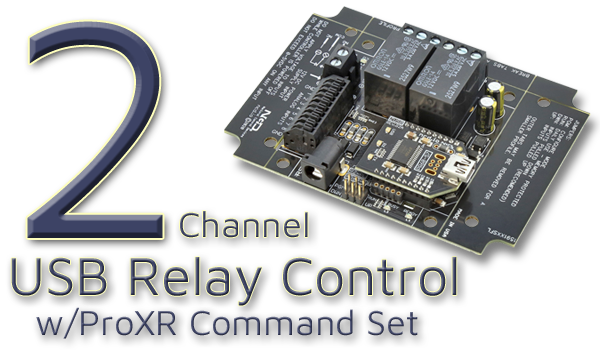
USB Relay Controller Board at a Glance...
- 2 Relays Installed on a Circuit Board
- Non-Expandable ProXR Lite Design - Onboard USB Interface Module
- Connects Directly to a USB Pport
- Mounts as a Virtual COM Port for Seamless Integration - Industry-Leading ProXR Command Set
- Program in Nearly Any Language
- Send Precise Relay Commands
- Toggle, Flash, and Timing Control - ProXR AD8 Command Set (Input Support)
- Read 0-5V Sensors
- Monitor External Sensors or Contact Closure
- Use Inputs to Trigger Relays
Reliable USB Relay Control
Send commands to the board via your computer's USB port using the industry-leading ProXR Command Set. The board mounts as a virtual COM port on your PC, providing direct control of one or more relays.
USB Relay
The USB Relay interfaces directly with a host computer via USB and mounts as a virtual COM port, enabling command-level control of the relay on the board. When communicating over USB, all relay commands are transmitted from a virtual COM port over a direct USB connection to the controller, ensuring stable, high-speed data exchange without additional configuration.2-Channel USB Relay Series (ProXR Lite)
2-Channel USB Relay Boards are available in the non-expandable ProXR Lite version. While ProXR Lite boards cannot be expanded, they still support the full ProXR Command Set - the industry's most powerful relay control protocol.- Program in nearly any language.
- Send precise relay commands.
- Control with confidence.
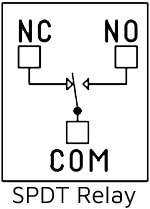
Select Your Relay Type & Amperage
Choose the 2-channel USB relay controller that matches your load requirements:- SPDT Relays: 5A, 10A, or 20A
- SPST Relays: 30A
Use our Choosing a Proper Amperage to make the right call for your application.
💡 Relay Pros ProTip:
If you're controlling high-current loads like motors or heaters, always choose a relay with extra amperage headroom. Running a relay at its maximum rating can shorten its lifespan.


